front panel overview
3
14
11
15
1
10
6
2
4
16
8
9
5
12
13
7
17
18
22
19
23
24
20
21
26
25
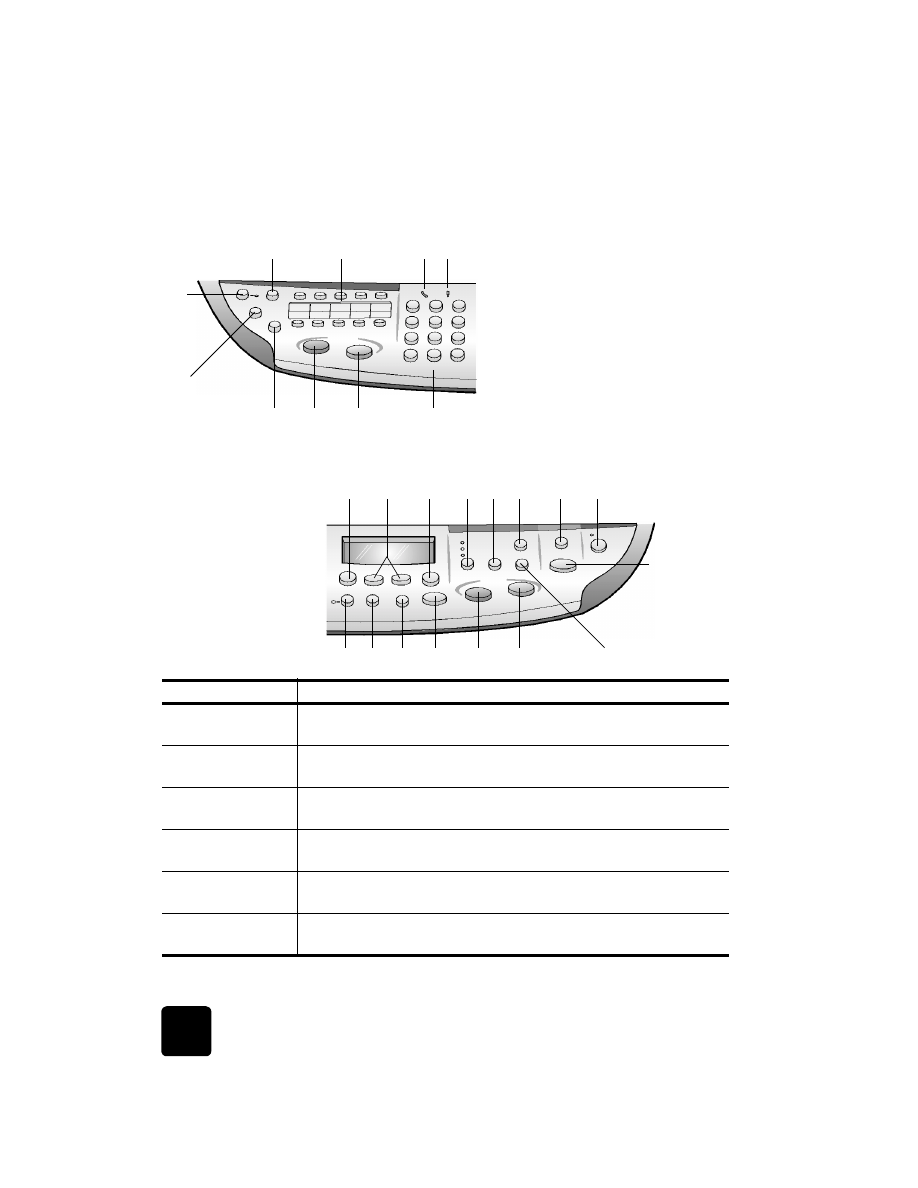
Right side of the front panel
Left side of the front panel
feature
purpose
1
Auto Answer: when the green light is on, fax transmissions will
automatically be accepted.
2
Speed Dial: use to access speed-dial numbers that have been set up from
the front panel or with the HP Director software.
3
One-Touch Speed-Dial Buttons: use to access the first 10 speed-dial
entries.
4
Phone Hook: the green LED in the shape of a phone indicates that the fax
line is in use when lit.
5
Needs Attention: the amber LED in the shape of an exclamation point
indicates that the device needs attention.
6
Resolution: use to set the fax resolution to Fine, Standard, 300 dpi, or
Photo. It will remain at the most recent setting until changed.
front panel overview
9
hp officejet d series
7
Pause/Redial: redials the most recently dialed number when in the ready
state. Inserts a pause (hyphen) when in the dialing state.
8
Start Fax - Black: starts a black and white fax.
9
Start Fax - Color: starts a color fax.
10
Keypad: use to dial fax numbers, and enter numbers such as the quantity
of copies or percentages when reducing or enlarging. You can also enter
text using the keypad.
11
Menu: use to access the menu system. The menus that are available
depend which model of the HP OfficeJet you have. Menu options include;
Photo Card Functions, Copy Setup, Fax Functions, Print Report, Speed Dial
Setup, Basic Fax Setup, Advanced Fax Setup, Status & Maintenance, and
Network Setup.
12
Arrows: use to scroll through menu settings, through options within
settings, or to move forward or backward to erase a text entry.
13
Enter: use to select or save the displayed setting.
14
Quality: use to select the quality of the copy from Best, Normal, or Fast.
15
Number of Copies: use to change the number of copies for this copy job.
This button can be used in conjunction with the arrow keys or the keypad
to make additional copies.
16
Reduce/Enlarge: use to reduce or enlarge an original to a specified image
size on paper loaded in the selected tray. The original may be fed from
the automatic document feeder (ADF) or placed on the glass.
17
Scan To: use to access a list of software programs that an image can be
scanned to. You must configure the Scan To list using the HP OfficeJet
software on the PC prior to using this feature.
18
On: turns the HP OfficeJet on and off.
19
Two-Sided Copy: use to make hands-free two-sided copies. Available only
if you have the two-sided printing accessory and the automatic document
feeder (ADF).
20
Tray Select/Paper Type: use to select the paper type. The main paper tray
supports plain paper and specialty papers. If your HP OfficeJet has the
250-sheet plain paper tray, use this button to select both the paper type
and the paper tray to use.
21
Lighter/Darker: use to adjust the lightness and darkness of the copies you
make and the faxes you send.
22
Cancel: use to stop a job, exit a menu, or exit button settings.
23
Start Copy - Black: use to start a black and white copy.
feature
purpose
quick start
10
hp officejet d series